Easy Homemade Mayo in an Immersion Blender
|
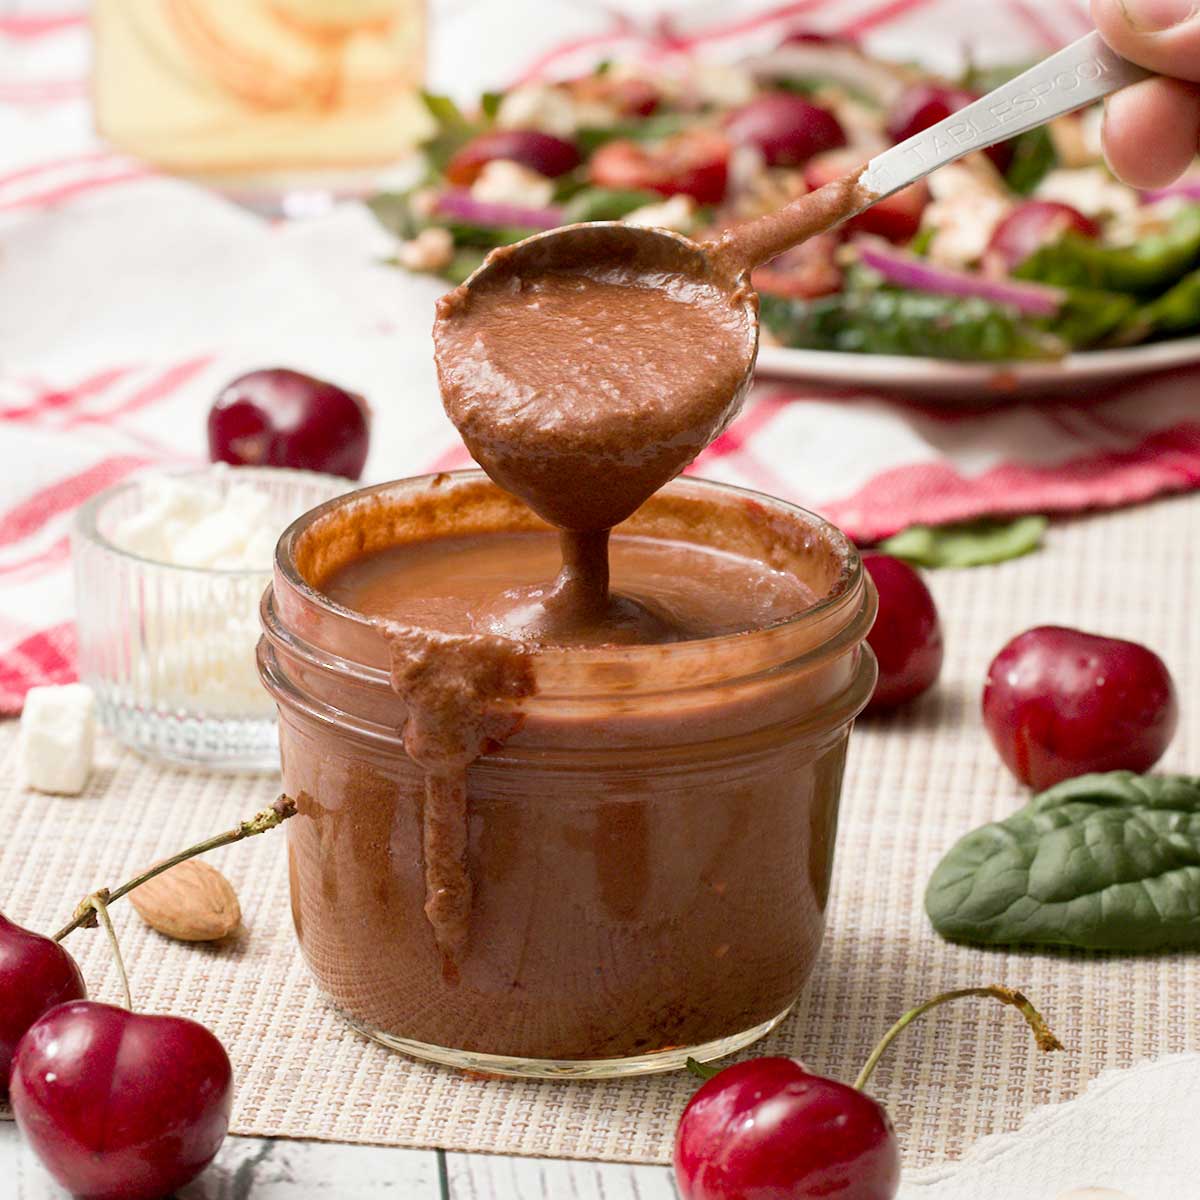
This easy homemade mayo is made with an immersion blender, egg, extra light olive oil, lemon juice, garlic, and mustard for a smooth, stable emulsion that comes together in minutes and works every time—no whisking, no drizzling, and no preservatives.

This easy homemade mayo is made with an immersion blender, egg, extra light olive oil, lemon juice, garlic, and mustard powder to create a creamy, fully emulsified mayonnaise in just a few minutes. Using the immersion blender method allows the oil and egg to emulsify quickly and consistently, producing a thick, stable mayo without tempering, slow drizzling, or special equipment.
What sets this recipe apart is the method. Instead of relying on slow drizzles or guesswork, this immersion blender technique locks the emulsion almost instantly, making it far more reliable than traditional whisked mayo and much less likely to break.
This mayo honestly tastes better than any store-bought version I’ve tried. After testing it with different oils, light olive oil is my favorite, and I love being able to control the oil I use instead of relying on the vegetable or canola oils found in most store-bought mayo—it feels better in my body and gentler on my digestion.
Why This Immersion Blender Mayo Works
- Immersion blender method: The blender head sits directly over the egg, so the emulsion forms quickly and consistently without slow drizzling or guesswork.
- Light olive oil: I’ve tested this with multiple oils, and light olive oil gives the best flavor and texture without bitterness or heaviness.
- Built-in stabilizers: Egg yolk lecithin and mustard work together to keep the mayo thick, creamy, and far less likely to break.
- Simple, controlled ingredients: Making it yourself means avoiding the vegetable and canola oils used in most store-bought mayo, which makes this feel better in my body.
Ingredients & Substitutions
Here is everything you need to make an easy immersion blender mayonnaise:
- Extra light olive oil: This is my go-to after testing several oils. It creates a smooth, creamy mayo without the bitterness that can happen with extra-virgin olive oil. Avocado oil also works well if you want a neutral option.
- Egg: The egg is what makes the emulsion happen, so there isn’t a true substitute here. I’ve found that a room-temperature egg gives the most consistent results with this immersion blender method.
- Lemon juice: Fresh lemon juice adds brightness and helps stabilize the mayo, but bottled lemon juice works in a pinch and still gives reliable results.
- White wine vinegar: I like using a small amount alongside the lemon for balance. Apple cider vinegar is a good substitute if that’s what you have on hand.
- Mustard powder: This adds flavor and helps keep the mayo stable. Dijon mustard works too, but it will give the mayo a slightly stronger mustard taste.
- Garlic powder: Garlic powder blends in smoothly and keeps the texture silky. If you prefer fresh garlic, use a very small amount so it doesn’t overpower the mayo.
- Salt: Use fine sea salt and adjust to taste. I usually start small and add more after blending once the flavors settle.
How to Make This Immersion Blender Mayonnaise
Step 1. Use the Right Container
This method works best with an immersion blender and a narrow container that’s just slightly wider than the blender head. The beaker that comes with most immersion blenders is perfect and helps the emulsion form quickly.

Step 2. Start With Room Temperature Egg
Crack 1 egg into the bottom of the container. I’ve tested this many times, and a room-temperature egg gives the most consistent, reliable results with this method. If needed, place the egg in a bowl of warm tap water for 5–10 minutes.

Step 3. Add The Remaining Ingredients
Add 2 tablespoons white wine vinegar, 1 tablespoon lemon juice, 1 teaspoon mustard powder, 1 teaspoon salt, and 1/4 teaspoon garlic powder directly into the container with the egg.
Step 4. Add the Oil
Pour in 1-1/4 cups oil, letting it settle on top of the egg and other ingredients. I usually let it sit for about 30–60 seconds so everything naturally separates before blending.

Step 5. Emulsify
Place the immersion blender all the way at the bottom of the container, directly over the egg. Turn the blender on high and hold it steady without moving. Within 15–20 seconds, the mixture at the bottom will turn thick and white.
Once the emulsion forms, slowly lift the immersion blender upward to incorporate the rest of the oil. As soon as everything is blended and creamy, stop blending to avoid breaking the mayo.

Step 6. Enjoy!
Transfer the mayo to an airtight container and refrigerate. It will thicken slightly as it chills and keep well for up to 1–2 weeks.

My Expert Recipe Tips
- Use a narrow container: I’ve found that a container just slightly wider than the immersion blender head makes this recipe far more reliable. Wide bowls don’t give the oil and egg a chance to emulsify properly.
- Let the oil settle before blending: Giving the oil 30–60 seconds to float to the top before turning on the blender makes a noticeable difference. It helps the emulsion catch quickly instead of struggling at the start.
- Watch the color, not the clock: As soon as the mixture at the bottom turns thick and white, you know it’s working. That visual cue matters more than timing and keeps you from over-blending.
- Stop as soon as it’s creamy: Once all the oil is incorporated, turn the blender off. Blending longer than needed can cause the mayo to loosen or break.
- Taste after chilling: The flavor settles and mellows after the mayo has chilled for a bit, so I usually adjust salt or acidity after it’s been in the fridge.
Delicious Serving Suggestions
- As a sauce base: Use this mayo as the base for creamy dressings like my Creamy Italian Dressing Olive Garden Copycat or Mexican Caesar Dressing with Cottage Cheese.
- For homemade ranch: Swap this mayo into my Homemade Ranch Dressing for an extra rich, classic ranch flavor without store-bought oils.
- In creamy salads: This mayo works beautifully in potato salad, tuna sandwich salad, or any creamy salad where you want clean ingredients and better flavor.
- On sandwiches and wraps: Spread it on gluten-free sandwich bread, avocado buns, or ground chicken burgers for a smooth, rich layer that instantly upgrades simple meals.
- For dips and sauces: Mix it with herbs, garlic, or lemon to create quick dipping sauces for fries, veggies, or grilled chicken.
Frequently Asked Questions
Here are more everyday staple sauces made with simple ingredients to try next.


Easy Homemade Mayo in an Immersion Blender
Gluten-FreeEquipment
- 1 Immersion Blender with Beaker Cup https://amzn.to/3Zuw7cJ
Ingredients
- 1-1/4 cup oil (extra light olive oil is my fave)
- 1 egg must be room temperature
- 2 tablespoons white wine vinegar
- 1 tablespoon lemon juice
- 1 teaspoon mustard powder
- 1 teaspoon salt
- 1/4 teaspoon garlic powder
Instructions
- This method works best with an immersion blender and a narrow container that’s just slightly wider than the blender head. The beaker that comes with most immersion blenders is perfect and helps the emulsion form quickly.
- Crack 1 egg into the bottom of the container. I’ve tested this many times, and a room-temperature egg gives the most consistent, reliable results with this method. If needed, place the egg in a bowl of warm tap water for 5–10 minutes.
- Add 2 tablespoons white wine vinegar, 1 tablespoon lemon juice, 1 teaspoon mustard powder, 1 teaspoon salt, and 1/4 teaspoon garlic powder directly into the container with the egg.
- Pour in 1-1/4 cups oil, letting it settle on top of the egg and other ingredients. I usually let it sit for about 30–60 seconds so everything naturally separates before blending.
- Place the immersion blender all the way at the bottom of the container, directly over the egg. Turn the blender on high and hold it steady without moving. Within 15–20 seconds, the mixture at the bottom will turn thick and white.
- Once the emulsion forms, slowly lift the immersion blender upward to incorporate the rest of the oil. As soon as everything is blended and creamy, stop blending to avoid breaking the mayo.
- Transfer the mayo to an airtight container and refrigerate. It will thicken slightly as it chills and keep well for up to 1–2 weeks.
Video
Notes
Nutrition
Important Disclaimer
This recipe is created by a home cook and not a medical professional. Our ingredient philosophy is reviewed by RDNs, but this specific post is not personalized medical advice. Please consult your healthcare provider for dietary concerns.
Responses
-
I don’t have an immersion blender. Can a mixer or regular blender be used?
-
Hi Linda, yes, it can. But you have to use a different technique of VERY slowly pouring in the oil while it’s mixing. I haven’t perfected that method yet 🙂 I recommend doing a search for ‘homemade mayo in an upright blender’ and then watch a few of the videos in the search results.
-
-
I really want to make your recipe, I get nervous eating uncooked eggs, all those years growing up with warnings about uncooked eggs I guess. How do I get over the hump? Thanks for all your wonderful recipes
Debbie-
Hi Debbie, I understand your concern and I appreciate that you love my recipes! I just did a google search and here are a few suggestions that might help…Use pasteurized eggs: Pasteurized eggs are heated to kill any harmful bacteria, making them safer to consume uncooked.
Understand the science: The acidic ingredients (like lemon juice or vinegar) help to create a safe environment that inhibits bacterial growth. I hope this helps 🙂
-
-
How long with the Mayo last in the fridge. I made the Italian dressing, it was fantastic who I stored in the fridge or on the counter? And how long will that last?
-
Hi Jackie, I’m so glad you love the Italian dressing. I had some on my chicken salad last night 🙂 I have found the mayonnaise and dressing last about 10-14 days in the fridge in a glass airtight container. I don’t store them on the counter.
-
-
This turned out great! I never put mayonnaise on sandwiches. Now I will definitely be making your mayo recipe
to put on sandwiches. It makes me feel good because it is healthy.-
Thank you Carolyn! I keep a jar of this mayonnaise in my fridge at all times!! 🙂
-

Leave a Reply