Oat Flour Pie Crust (Gluten-Free, Press or Roll)
|
This gluten-free oat flour pie crust is easy to press or roll without cracking. Made with oat flour, tapioca flour, butter, and maple syrup, it bakes up sturdy with great flavor and works for both sweet and savory pies.

This oat flour pie crust is a reliable gluten-free option when you want a dough that’s easy to work with and actually holds together. It’s made with oat flour, tapioca flour, butter, and maple syrup to create a crust you can either press into the pan or roll out between parchment without fighting cracks or crumbling edges.
What sets this recipe apart is how workable it is. Many oat flour crusts are either too crumbly to roll or so soft they fall apart when sliced. This version uses a small amount of tapioca flour and maple syrup to help the dough bind, so it shapes easily, bakes up sturdy, and still has a tender bite.
I used to feel intimidated by pie crusts, but being able to press this dough right into the pie plate made all the difference. It’s easy to shape the edges, make pretty flutes, and end up with a crust you feel proud of. It’s also gentler on my tummy, and I love the extra flavor oat flour brings compared to regular all-purpose flour.
Why This Oat Flour Pie Crust Works
- Press or roll flexibility: The dough is easy to press into the pan or roll between parchment without cracking or tearing.
- Reliable binding: Tapioca flour and maple syrup help the crust hold together even without gluten.
- Balanced hydration: A short rest or chill lets the oat flour fully hydrate so the crust isn’t gritty or gummy.
- Better flavor: Oat flour adds a lightly nutty taste that works beautifully in both sweet and savory pies.
How Does a Gluten-Free Oat Flour Pie Crust Compare to a Traditional Pie Crust?
A gluten-free oat flour pie crust doesn’t have gluten, so it won’t stretch or flake the same way as a wheat-based crust. Instead, it bakes up tender with a lightly crumbly texture and a subtle nutty flavor. It’s easier to press into the pan and shape, while traditional crusts are more elastic and flaky.

Ingredients & Substitutions
Here’s everything you need to make this gluten-free oat flour pie crust.
These notes are based on what I’ve tested and what consistently gives the best texture and structure.
- Oat flour: I use store-bought or homemade. Homemade oat flour is coarser, so I let the dough rest a few minutes before shaping.
- Tapioca flour: This helps the crust hold together once baked. You can skip it, but the crust will be more crumbly. Arrowroot or cornstarch also work.
- Butter: Butter gives the best flavor and structure. Dairy-free butter or coconut oil work, but the dough will be softer.
- Maple syrup: This helps bind the dough and adds light sweetness. Honey or agave work too. For savory pies, I reduce the amount.
- Cold water: A little goes a long way. I always start with less and add more only if needed.
- Cinnamon (optional): Great for dessert pies like apple or pumpkin. I leave it out for savory pies.
- Salt: A small amount makes a big difference in flavor, even for sweet pies.
Easily Adapt This Recipe for Any Diet
This crust is naturally easy to adjust. These simple swaps keep the same texture and structure I get with the original version.
- Gluten-Free: This recipe is gluten-free as written. Just be sure to use certified gluten-free oat flour if needed.
- Dairy-Free: Use plant-based butter or coconut oil instead of butter. The dough will be slightly softer but still easy to press or roll.
- Vegan: Use plant-based butter or coconut oil and maple syrup as written. No other changes are needed.
💡 Pro Tip: If you try a swap that works especially well, leave a comment so others can learn from it too.

How to Make My Gluten-Free Oat Flour Pie Crust Recipe
Here are simple, step-by-step instructions for making this oat flour pie crust. You’ll also find these steps in the recipe card at the bottom of the post.
Step 1: Make the Crust Dough
Add 1 cup oat flour, 1/3 cup tapioca flour, 1/4 teaspoon salt, and 1/4 teaspoon cinnamon to a mixing bowl or food processor and mix to combine. Add 1/2 cup butter, cut into small pieces, and 2 tablespoons maple syrup, then mix until the mixture looks crumbly. Add 1 tablespoon cold water and mix just until a dough forms.
The dough should hold together when pressed between your fingers without feeling wet or sticky. If it feels dry, add another teaspoon of water. If it feels sticky, let it rest for a few minutes so the oat flour can hydrate.
Step 2: Shape the Crust
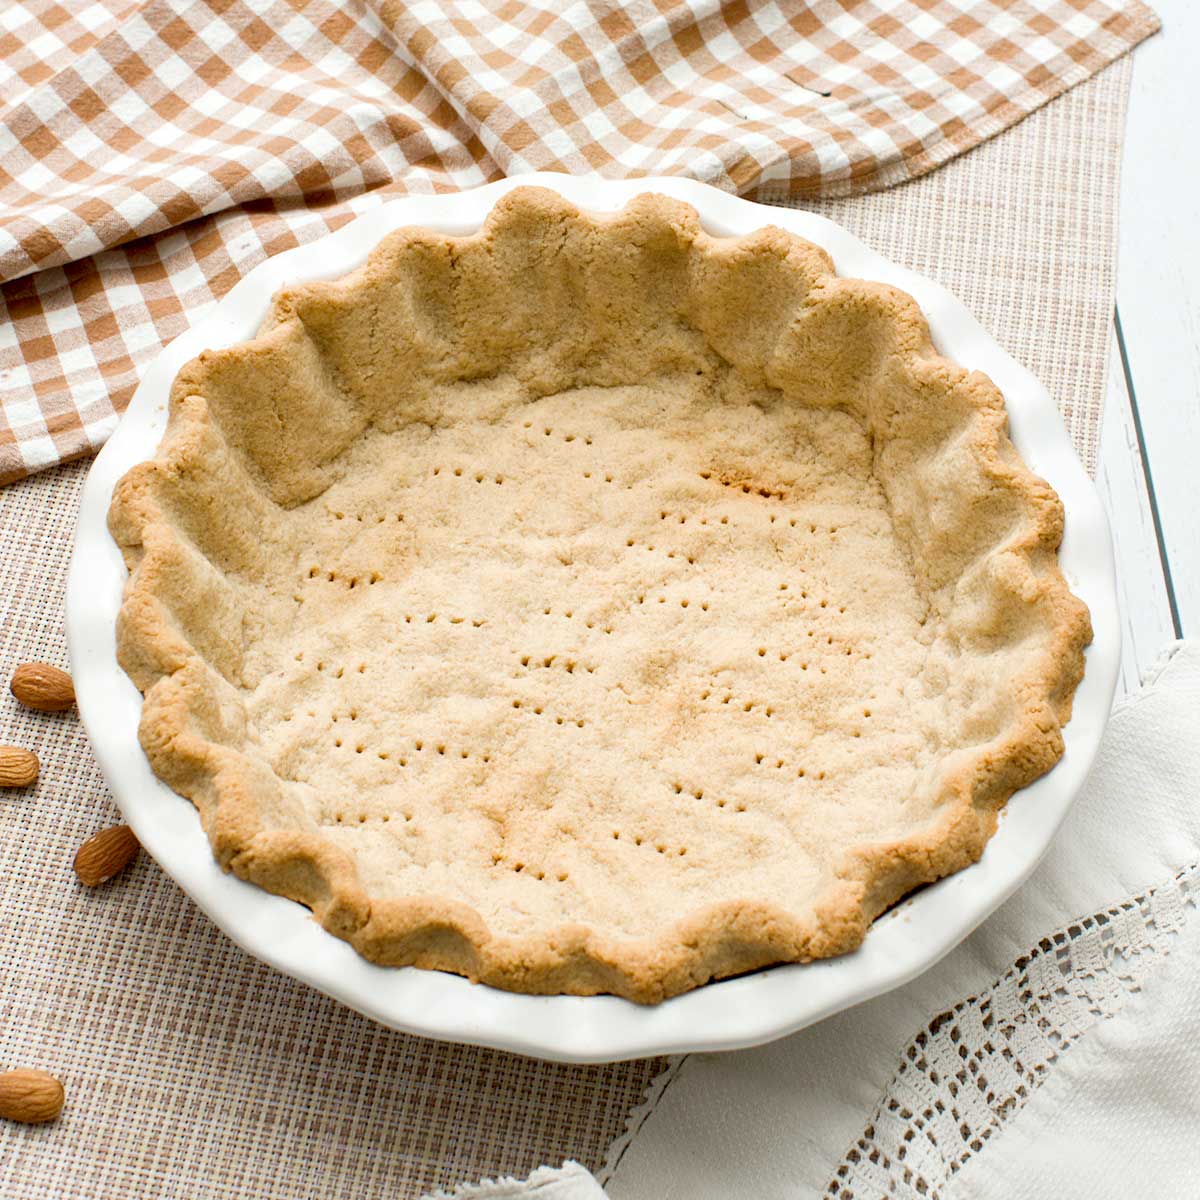
Press method: Press the dough evenly into a 9-inch pie plate, working it up the sides and shaping the edges as desired.
Roll method: Roll the dough between two sheets of parchment paper, then gently transfer it to the pie plate and shape the edges.
If the dough feels too soft to work with, chill it for 15 to 30 minutes before baking or filling.


How to Blind Bake an Oat Flour Pie Crust
Press or roll the dough into your pie plate, then chill it for 15 to 30 minutes so it holds its shape in the oven. Line the crust with parchment paper and fill it with pie weights, dried beans, or rice to keep the bottom from puffing.
Bake at 375°F (190°C) for 12 to 15 minutes, then carefully remove the parchment and weights. Return the crust to the oven and bake for another 5 to 7 minutes, just until the surface looks dry and lightly golden.
Oat flour browns faster than wheat flour, so keep an eye on the edges and use a pie shield if needed. The crust should feel set and dry to the touch, not just look browned. This method works well for no-bake fillings, custard pies, and pies that need a head start before adding the filling.

My Expert Recipe Tips
- Let the dough rest: I’ve found that oat flour needs a few minutes to soak up the liquid. When I rush this step, the dough feels gritty and harder to work with.
- Start with less water: I always add the water slowly. Oat flour absorbs quickly, and once the dough gets sticky, it’s hard to fix.
- Pressing is the easiest option: If rolling out pie crust stresses you out, press the dough into the pie plate instead. That’s how I make this most of the time, and it still looks beautiful with fluted edges.
- Keep an eye on the edges: Oat flour browns faster than wheat flour. I usually add a pie shield or a little foil once the edges start to color.
- Adjust for savory pies: When I’m making quiche or pot pie, I reduce the maple syrup and leave out the cinnamon so the crust doesn’t taste sweet.
Delicious Serving Suggestions
- Apple Pie: I love this crust with my apple crumble pie. The oat flour pairs really well with warm spices and holds up nicely under juicy fillings.
- Pumpkin Pie: This is one of my go-to crusts for pumpkin pie. The nutty flavor of the oat flour works beautifully with pumpkin and doesn’t get soggy.
- Blueberry Pie: The sturdier texture helps support juicy blueberry filling, especially when the pie needs to sit for a bit before serving.
- Cherry Pie: This crust balances sweet-tart cherry filling well and slices cleanly without falling apart.
- Chocolate Silk Pie: Because this crust blind bakes so well, it’s perfect for creamy, no-bake fillings like my chocolate silk pie.
- Quiche or Pot Pie: I skip the cinnamon and reduce the maple syrup when using this crust for savory pies. It works great for quiche, chicken pot pie, or veggie tarts.
- Mini Pies or Tarts: This dough presses easily into smaller pans, which makes it great for mini pies or tartlets.
Frequently Asked Questions
Do you love oat flour desserts? Check out more of my easy oat flour baking recipes:


Oat Flour Pie Crust (Gluten-Free, Press or Roll)
Gluten-FreeIngredients
- 1 cup oat flour
- 1/3 cup tapioca flour
- 1/4 teaspoon salt
- 1/4 teaspoon cinnamon
- 1/2 cup butter
- 2 tablespoons maple syrup
- 1 tablespoon cold water
Instructions
- Add 1 cup oat flour, 1/3 cup tapioca flour, 1/4 teaspoon salt, and 1/4 teaspoon cinnamon to a mixing bowl or food processor and mix to combine. Add 1/2 cup butter, cut into small pieces, and 2 tablespoons maple syrup, then mix until the mixture looks crumbly. Add 1 tablespoon cold water and mix just until a dough forms.The dough should hold together when pressed between your fingers without feeling wet or sticky. If it feels dry, add another teaspoon of water. If it feels sticky, let it rest for a few minutes so the oat flour can hydrate.
- Press method: Press the dough evenly into a 9-inch pie plate, working it up the sides and shaping the edges as desired.Roll method: Roll the dough between two sheets of parchment paper, then gently transfer it to the pie plate and shape the edges.
- If the dough feels too soft to work with, chill it for 15 to 30 minutes before baking or filling.
Video
Notes
Nutrition
Important Disclaimer
This recipe is created by a home cook and not a medical professional. Our ingredient philosophy is reviewed by RDNs, but this specific post is not personalized medical advice. Please consult your healthcare provider for dietary concerns.
Looking for more desserts made without refined sugar?
Browse all of my naturally sweetened dessert recipes, made with maple syrup, honey, fruit, and other simple sweeteners for treats that feel familiar and satisfying.

Loved it. Baked an apple rhubarb pie. But you didn’t give any oven temperature. I baked mine at 350* for30 to 40 minutes until brown. Did a crumble mix on top.
Oh yum, that sounds amazing. Thank you for sharing! And thanks for letting me know the bake time was missing. I’ll add it right now 🙂
I don’t have a food processor. Could I use a stand mixer?
Yes, Patty 🙂 You could also use a spatula and mix it by hand. Let me know how it turns out 🙂
delicious
Thank you, Henry 🙂
Thank you! This is the exact recipe I was looking for. I can’t wait to make it 🙂
You’re welcome, Linda! Please let me know how it turns out 🙂
I’m excited to share this really easy recipe for a melt-in-your-mouth pie crust made of oat flour. I hope you enjoy it, too!