Gluten-Free Mini Pumpkin Pies with Oat Flour Crust
|
These Gluten-Free Mini Pumpkin Pies are made with oat flour and cottage cheese and offer a protein boost and just the right amount of sweetness with maple syrup and cane sugar without refined sugar. Whether for Thanksgiving or Christmas, this mini pumpkin pie recipe will have all your guests loving every bite—even those without celiac disease.

These Gluten-Free Mini Pumpkin Pies are the perfect way to enjoy a slice of pumpkin pie without all the hassle, and they’re guaranteed to be a hit with everyone. As a home cook who’s always experimenting with wholesome ingredients, I’ve made this mini pumpkin pie recipe time and time again for Thanksgiving and Christmas gatherings. It’s simple to whip up, and the crust is super easy to make. The best part? It’s made with wholesome ingredients like oat flour and cottage cheese, giving it a protein boost while still offering just the right amount of sweetness without relying on refined sugar.
This recipe is perfect for the holiday season, and I promise all your guests will love these mini pies—even if they don’t have celiac disease. Whether you’re hosting a holiday dinner or just craving a little treat during this special time of year, this mini pumpkin pie recipe will have you covered. The traditional pumpkin pie flavors are there, but with a twist, making it the best choice for your next slice of pumpkin pie. Enjoy!
Why You’ll Love This Gluten-Free Mini Pumpkin Pies Recipe
- Mini & Perfectly Sized: These little pies are just the right size for a sweet treat that’s not too heavy.
- Simple Ingredients: Made with oat flour and pumpkin, these pies have such a rich, cozy flavor.
- Naturally Sweetened: We’re keeping it sweet and simple with maple syrup and cane sugar.
- Easy to Make: With just a few easy steps, you’ll have these delicious pies ready in no time!

Ingredients & Substitutions
Here is everything you need to make the best mini pumpkin pies recipe:
Oat Flour: If you don’t have oat flour, try using gluten-free all-purpose flour or almond flour for a nice texture.
Tapioca Flour: You can swap out tapioca flour for cornstarch or arrowroot powder—both work great!
Unsalted Butter: Ghee or plant-based vegan butter are great dairy-free options if that’s what you need. You can also use salted butter and reduce the amount of added salt.
Cottage Cheese: Ricotta cheese or even sour cream can be used instead of cottage cheese if you prefer.
Cane Sugar: Brown sugar, coconut sugar, or even maple sugar can be used if you like a bit of a richer flavor.
Pure Maple Syrup: Honey or agave syrup will work if you’re looking for a different sweetener.
Vanilla Extract: If you don’t have vanilla extract, you can use vanilla bean paste or even almond extract for a twist.
Pumpkin Pie Spice: Don’t have pumpkin spice? Just mix cinnamon, nutmeg, and allspice together—no problem!
Fresh Ginger: Fresh ginger gives the best flavor, but you can also use ground ginger if that’s what you have.
Eggs: For a vegan version, swap eggs for flax eggs or chia eggs.

How to Make My Gluten Free Mini Pumpkin Pies Recipe
Here are easy, detailed, step-by-step instructions for making my easy gluten-free Thanksgiving dessert recipe. The instructions are also repeated in the recipe card at the bottom of this blog post.
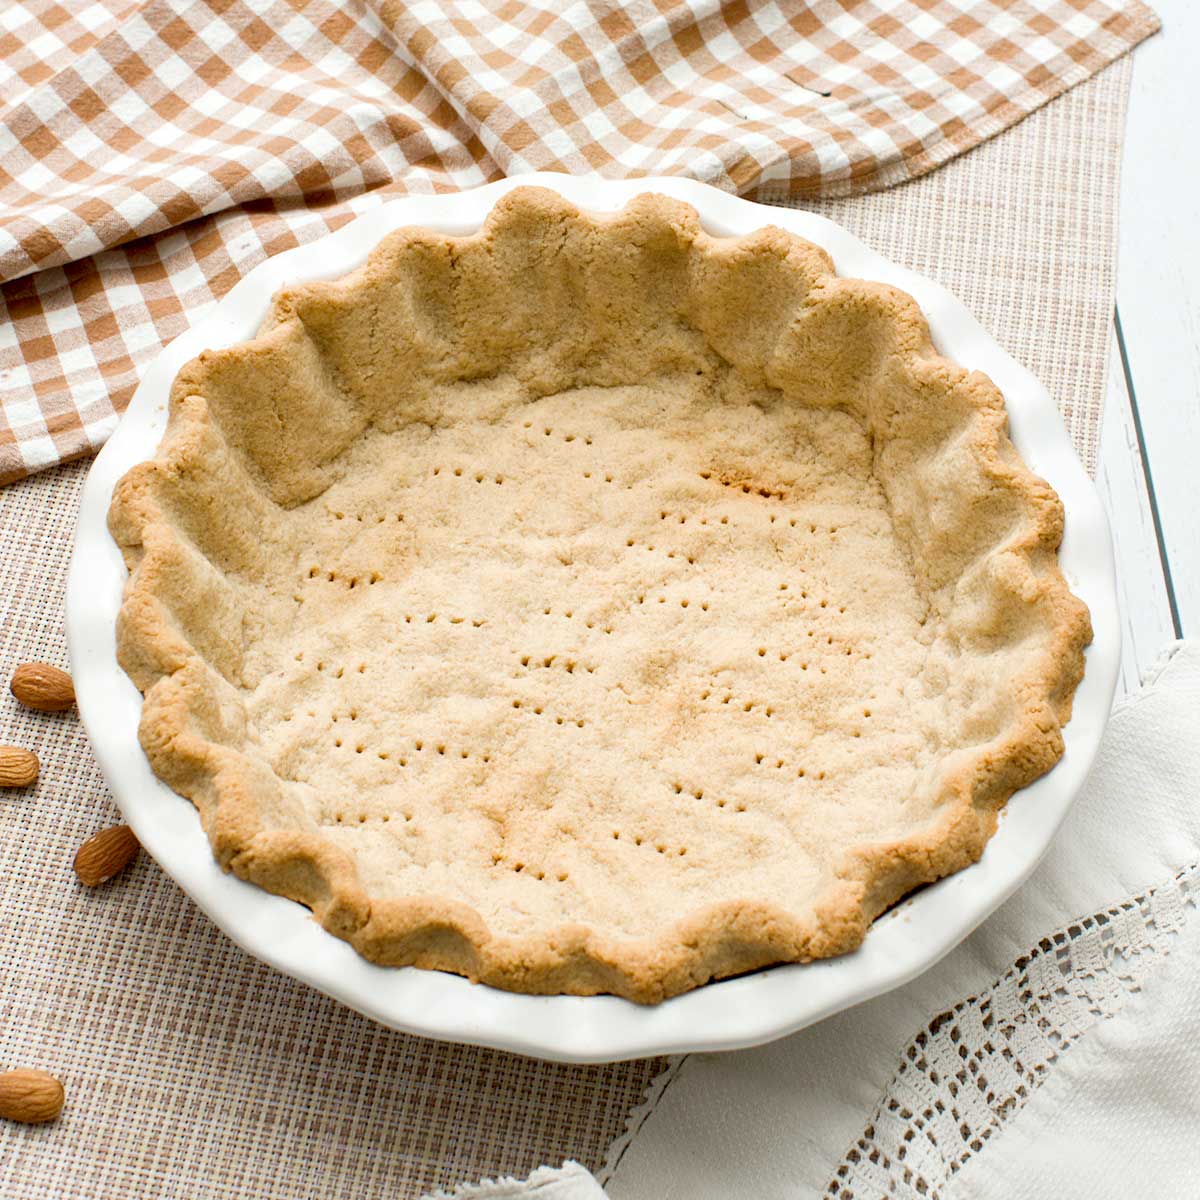
Step 1: Make the Pie Crust Dough
Preheat your oven to 350°F (175°C) and lightly grease your muffin pan.
In a mixing bowl or food processor, combine 1-1/2 cups oat flour, 1/2 cup tapioca flour, 1/4 teaspoon salt, and 1/2 teaspoon cinnamon. Pulse until blended. Cut 3/4 cup butter into small pieces and 3 tablespoons maple syrup into the mixture and pulse until the mixture is crumbly. Add 2 tablespoons cold water and pulse until a dough forms.
Divide the dough into 12 equal portions, approximately 40 grams each. Press the dough into the muffin tin to form the crusts. You can also roll the dough with a rolling pin and then press it inside the muffin cups. Poke several holes in the bottom of each crust using a fork.


Step 2: Make the Pumpkin Filling
Wash out your food processor and add 15 ounces of pumpkin puree, 1/2 cup cottage cheese, 1/3 cup cane sugar, 1/3 cup maple syrup, 2 teaspoons vanilla extract, 2 tablespoons tapioca flour, 2 teaspoons pumpkin pie spice, 1/2 teaspoon ginger, and 1/2 teaspoon salt and blend until smooth you no longer see the cottage cheese curdles. Add the 3 eggs and mix just until blended.


Step 3: Fill the Crusts
Spoon the pumpkin filling into the crusts with a large cookie scoop or measuring cup, filling each one nearly full.
Bake for 35-40 minutes, or until the filling is set and a toothpick comes out clean when inserted.
Let them cool completely before serving and adding whipped cream on top.


Expert Recipe Tips
Make Ahead: You can make the crust and filling ahead of time and store them in the fridge. When you’re ready to bake, just assemble and pop them in the oven!
Crust Tip: If the dough feels a little sticky, just add a touch more oat flour to get it to the right consistency for the best pumpkin pie.
Delicious Serving Suggestions
- Whipped cream, anyone? Adding a little whipped cream on top with a piping bag is a perfect way to finish off these pies.
- Pecans add a nice touch: Sprinkle crushed pecans on top for a bit of crunch and flavor.
- Cozy drinks: These pies go so well with a cup of chai or spiced tea on the side.
- Perfect for sharing: Great for family gatherings or when you’re hosting friends for a cozy treat.
- A little caramel drizzle: Drizzle some caramel sauce on top to take these mini pies up a notch!
- Vanilla ice cream: Top them with a scoop of vanilla ice cream for a perfect combo of warm and cold.
- Fall vibes: These pies are the perfect treat when you’re embracing all things fall—serve them at your next autumn gathering!
Do you love pumpkin desserts? Check out more of my easy pumpkin recipes:
- Gluten-Free Pumpkin Bread with Cream Cheese Frosting
- Healthy Gluten-Free Pumpkin Roll with Almond Flour
- Gluten-Free Pumpkin Snickerdoodles with Almond Flour
- Protein Pumpkin Waffles (Gluten-Free with Oat Flour)
- Pumpkin Cottage Cheese Scones (Chocolate Chunk)
- Copycat Gluten-Free Olive Garden Pumpkin Cheesecake
- Gluten-Free Maple Pumpkin Pie with Almond Flour
- Homemade Pumpkin Cheesecake Cottage Cheese Ice Cream

Gluten-Free Mini Pumpkin Pies with Oat Flour Crust
Gluten-FreeIngredients
Pie Crust:
- 1-1/2 cups oat flour (180g)
- 1/2 cup tapioca flour (60g)
- 1/2 teaspoon cinnamon
- 1/4 teaspoon salt
- 3/4 cup butter (170g)
- 3 tablespoons maple syrup
- 2 tablespoons cold water
Pumpkin Filling:
- 15 ounce pumpkin puree
- 1/2 cup cottage cheese
- 1/3 cup cane sugar
- 1/3 cup maple syrup
- 2 teaspoons vanilla extract
- 3 tablespoons tapioca flour
- 2 teaspoons pumpkin pie spice
- 1/2 teaspoon ginger
- 1/2 teaspoon salt
- 3 eggs
Instructions
- Preheat your oven to 350°F (175°C) and lightly grease your muffin pan.In a mixing bowl or food processor, combine 1-1/2 cups oat flour, 1/2 cup tapioca flour, 1/4 teaspoon salt, and 1/2 teaspoon cinnamon. Pulse until blended. Cut 3/4 cup butter into small pieces and 3 tablespoons maple syrup into the mixture and pulse until the mixture is crumbly. Add 2 tablespoons cold water and pulse until a dough forms.
- Divide the dough into 12 equal portions, approximately 40 grams each. Press the dough into the muffin tin to form the crusts. You can also roll the dough with a rolling pin and then press it inside the muffin cups. Poke several holes in the bottom of each crust using a fork.
- Wash out your food processor and add 15 ounces of pumpkin puree, 1/2 cup cottage cheese, 1/3 cup cane sugar, 1/3 cup maple syrup, 2 teaspoons vanilla extract, 2 tablespoons tapioca flour, 2 teaspoons pumpkin pie spice, 1/2 teaspoon ginger, and 1/2 teaspoon salt and blend until smooth you no longer see the cottage cheese curdles. Add the 3 eggs and mix just until blended.
- Spoon the pumpkin filling into the crusts with a large cookie scoop or measuring cup, filling each one nearly full.Bake for 35-40 minutes, or until the filling is set and a toothpick comes out clean when inserted.Let them cool completely before serving and adding whipped cream on top.
Video
Notes
Nutrition
Important Disclaimer
This recipe is created by a home cook and not a medical professional. Our ingredient philosophy is reviewed by RDNs, but this specific post is not personalized medical advice. Please consult your healthcare provider for dietary concerns.
Looking for more desserts made without refined sugar?
Browse all of my naturally sweetened dessert recipes, made with maple syrup, honey, fruit, and other simple sweeteners for treats that feel familiar and satisfying.

A few of my family members have to eat gluten free and these were perfect! Everyone ate them 🙂 Thank you!
I’m excited to share this easy, fun and delicious recipe! I hope you enjoy it 🙂
We have a few family members who need GF, and these were a hit with everyone!
Thank you so much for the review, Andrea! I’m so glad everyone loved these 🙂